글 수 93
File > New 하셔서 새 파일을 하나 만들어 줍니다
아래그림처럼 대화상자가 나타나지요
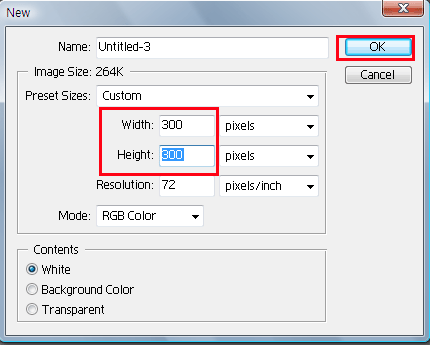
저는 사이즈를 가로 X 세로 300px 로 하겠습니다~~
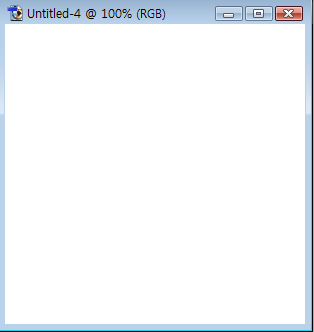
그럼 이렇게~~~
2.
새파일에 페인트를 부어서 나무의 질감을 만들어 보겠습니다
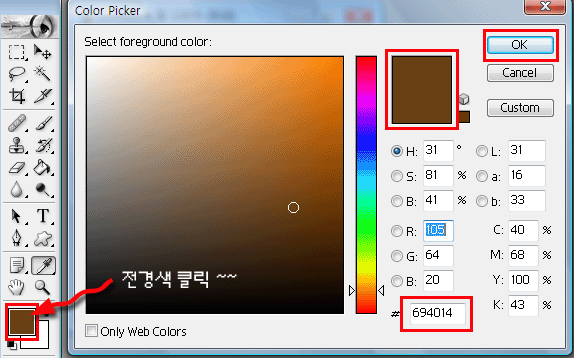
일단 포토샵 왼쪽 도구툴에서 전경색을 클릭하시면
칼라픽커(Color Picker) 대화상자가 나타납니다
그림하단을 보시면 색상을 정확하게 해줄 수 있도록
색상번호를 직접 써주셔도 되구요
아니면~~~ 적당히 고동색을 클릭하셔도 됩니다
저는 이렇게 했습니다~~
- 전경색 색상-
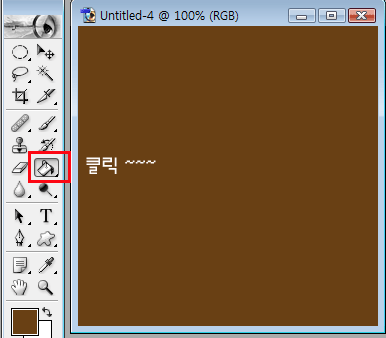
그런 다음 페인트 툴을 클릭~~
색이 재워집니다
똑같은 방법으로 하단색을 지정해 주세요
왼쪽 도구툴에서 배경색 ...클릭
색상번호 ... #ce9118

3
이제 다시 포토샵 상단메뉴에서
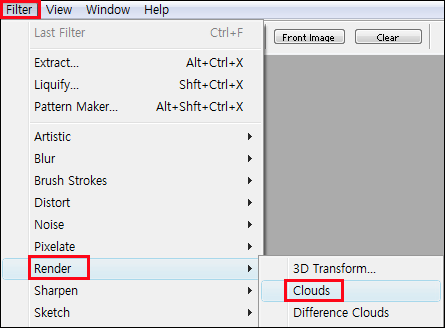
Filter > Render > Clouds ...클릭
그림처럼 찾아가세요~~
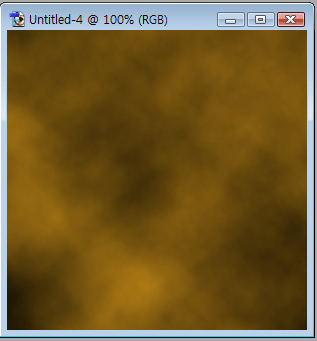
그럼 이렇게 고동색이 변했지요^^
4.
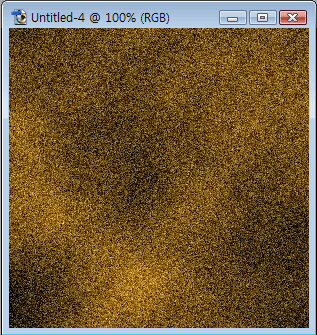
더욱 더 나무질감이 나도록 노이즈를 주겠습니다
다시 포토샵 상단메뉴에서
Filter > Noise >Add Noise ...클릭
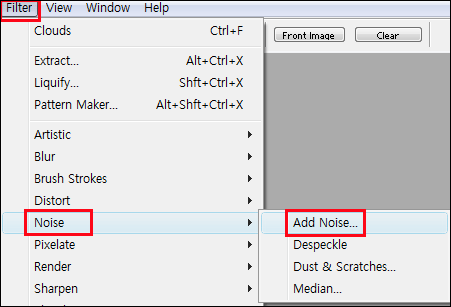
아래처럼 대화상자를 설정해주세요~~~
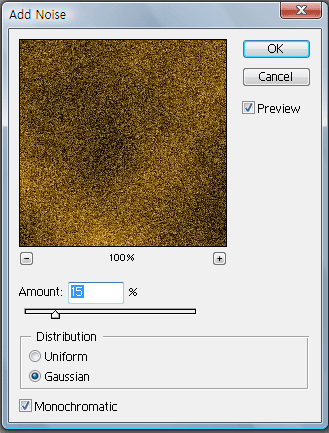
이렇게 변했나요^^
5.
또 다시 다른 필터를 적용해줍니다
필터 찾아가는 그림은 생략할게요~~
찾아가는 방법은 위에서처럼 하시면 됩니다^^
Filter > Blur > Motion Blur
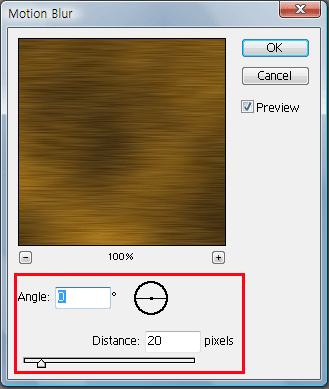
이렇게 됩니다~
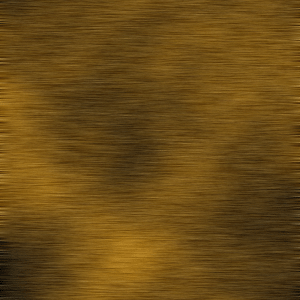
6.
Filter > Distort > Twirl를 대화상자처럼 설정해주세요~
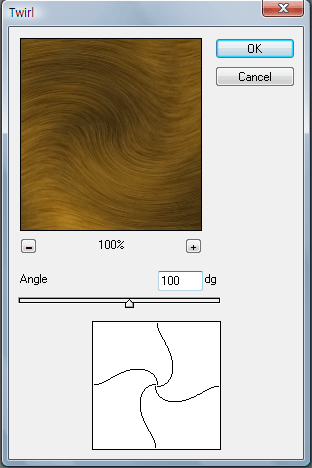
이렇게 변했네요~
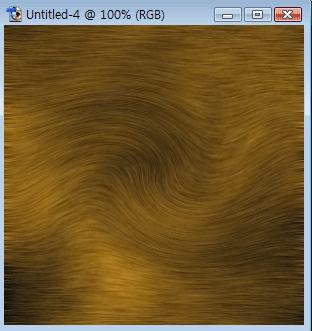
7.
이제까지는 나무액자 질감을 내려고 한 작업들이였습니다
액자 프레임부분을 만들어야 하는데요
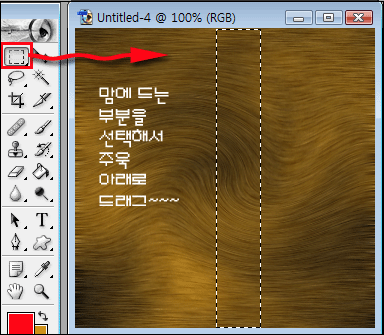
Twirl효과를 준 부분중에서 맘에 드는 부분을 골라
프레임으로 쓰려합니다
그림처럼 사각형툴을 클릭...적당한 곳을 골라 드래그~~
8.
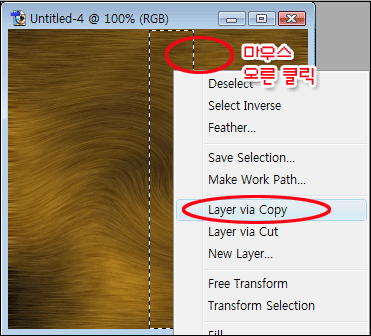
드래그 한 부분에다 마우스 오른 클릭하셔서
Layer via copy하세요~
그림참고입니다
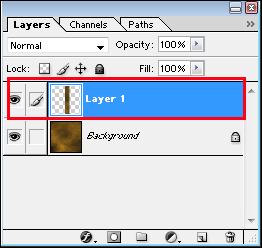
레이어를 보시면 이렇게 Layer1이 생겼지요
9.
만들어진 Layer1을 레이어추가하는 아이콘쪽으로
드래그하면 copy1이 하나 만들어집니다
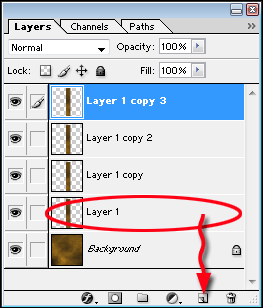
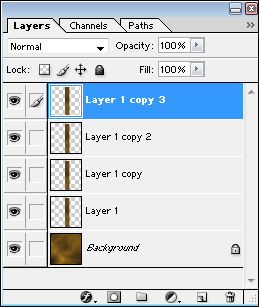
다시 그 copy1을 주욱 아래로 드래그 하면...copy2
copy2를 드래그 ... copy3가
그림처럼 형성이 됩니다. 이렇게 되셨나요^^
10.
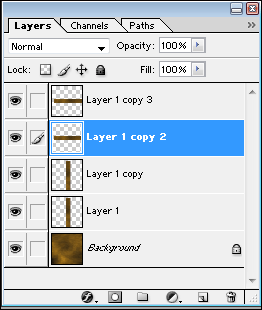
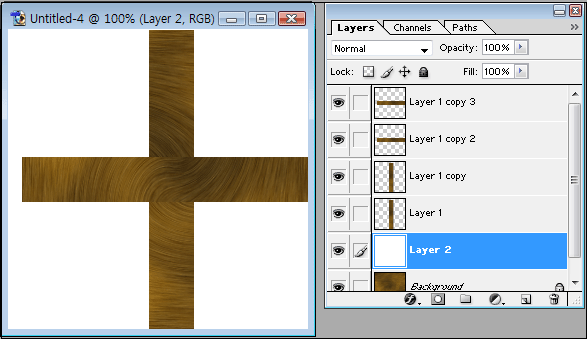
이젠 네개의 프레임중 두개는 가로로 세워줘야 합니다
Edit > Transform > Rotate 90CW 로 해줍니다
저는 여기서 copy3와 copy2를 할께요~~
이렇게 레이어가 가로로 변했을 겁니다^^
11.
이젠 레이어 백그라운드를 클릭... 파랗게 활성화되었지요
이 상태에서 새 레이어 추가를 하신 후 (레이어 아이콘 클릭하시면 됩니다)
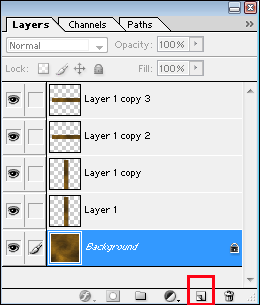
흰색을 부어줍니다
파일이 이렇게 되어 있을겁니다
12.
레이어를 하나씩 클릭 ....이동
또 다른 레이어 클릭 ...이동
이렇게 이동툴을 이용해서 가장자리로 이동시켜주세요~
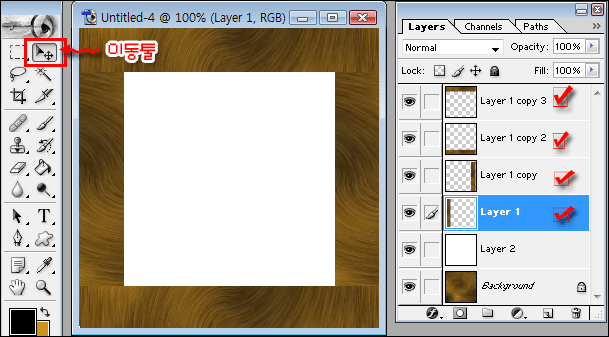
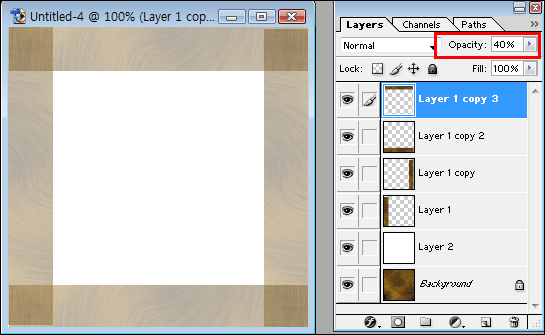
다시 각각의 레이어 ....Layer1 ~ Layer Copy3...클릭
Opacity를 40%로 낮추어 줍니다
그림처럼요~~~
잘 따라 오시는 거죠^^
13.
그림에서 모서리가 짙어 보이는 부분을 잘라주겠습니다
레이어는 카피1으로 하신 후 ...
도구툴에서 다각형 툴을 선택 ...
점선처럼 그려 주신 후 ... Delete
그림처럼요.
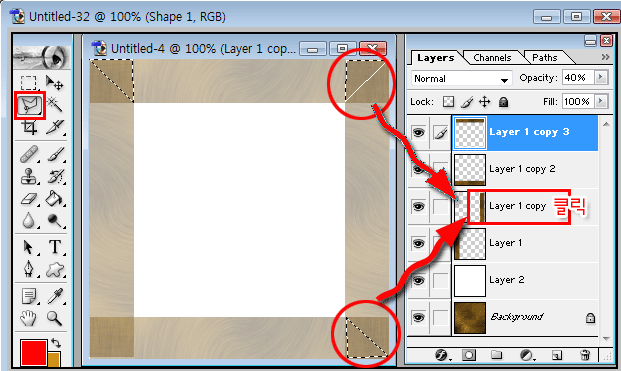
다시 그림처럼 겹쳐지는 모든 부분은
그 해당 레이어를 선택...
도구툴에서 다각형 툴을 선택 ... Delete
네번의 과정을 거쳐고 나면
이렇게 되지요~
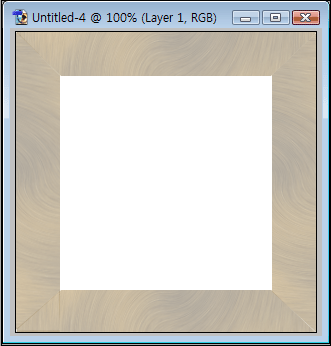
겹쳐지는 짙은 색부분을 잘 보려고 흐리게 했었던 Opacity를
다시 100%로 해주세요...물론 각 내개의 레이어를 선택해서
해주셔야 합니다~~
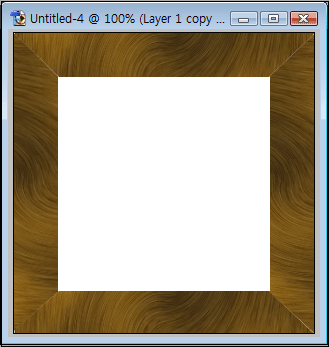
14.
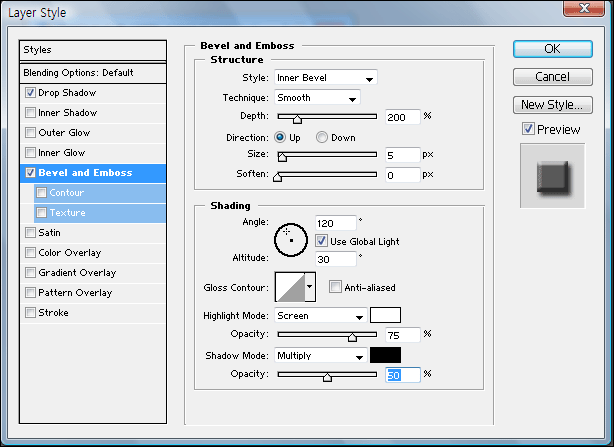
이제 마지막으로 각 프레임을 좀 볼륨있게 만들어줍니다
레이어 하단을 보시면 f라고 되어 있는 부분을 클릭~!!!
레이어 스타일을 그림처럼 설정을 하시고
Drop Shadow는 그림을 봐 가시면서 적당히 만들어줍니다
물론 각 각 레이어를 클릭 하셔야 적용이 된답니다
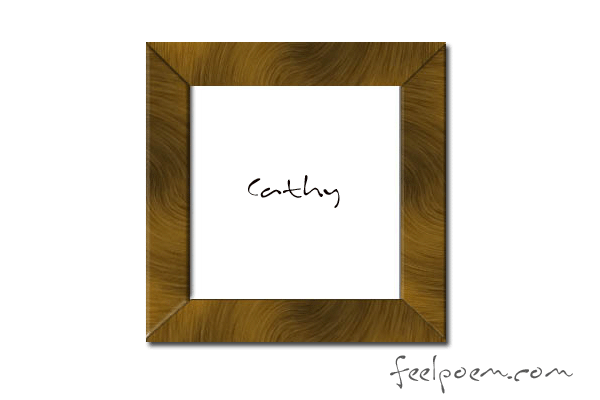
저는 이렇게 만들어 보았습니다
아래그림처럼 대화상자가 나타나지요

저는 사이즈를 가로 X 세로 300px 로 하겠습니다~~
그럼 이렇게~~~

2.
새파일에 페인트를 부어서 나무의 질감을 만들어 보겠습니다
일단 포토샵 왼쪽 도구툴에서 전경색을 클릭하시면
칼라픽커(Color Picker) 대화상자가 나타납니다
그림하단을 보시면 색상을 정확하게 해줄 수 있도록
색상번호를 직접 써주셔도 되구요
아니면~~~ 적당히 고동색을 클릭하셔도 됩니다
저는 이렇게 했습니다~~
- 전경색 색상-

그런 다음 페인트 툴을 클릭~~
색이 재워집니다

똑같은 방법으로 하단색을 지정해 주세요
왼쪽 도구툴에서 배경색 ...클릭
색상번호 ... #ce9118

3
이제 다시 포토샵 상단메뉴에서
Filter > Render > Clouds ...클릭
그림처럼 찾아가세요~~

그럼 이렇게 고동색이 변했지요^^

4.
더욱 더 나무질감이 나도록 노이즈를 주겠습니다
다시 포토샵 상단메뉴에서
Filter > Noise >Add Noise ...클릭

아래처럼 대화상자를 설정해주세요~~~

이렇게 변했나요^^

5.
또 다시 다른 필터를 적용해줍니다
필터 찾아가는 그림은 생략할게요~~
찾아가는 방법은 위에서처럼 하시면 됩니다^^
Filter > Blur > Motion Blur

이렇게 됩니다~

6.
Filter > Distort > Twirl를 대화상자처럼 설정해주세요~

이렇게 변했네요~

7.
이제까지는 나무액자 질감을 내려고 한 작업들이였습니다
액자 프레임부분을 만들어야 하는데요
Twirl효과를 준 부분중에서 맘에 드는 부분을 골라
프레임으로 쓰려합니다
그림처럼 사각형툴을 클릭...적당한 곳을 골라 드래그~~

8.
드래그 한 부분에다 마우스 오른 클릭하셔서
Layer via copy하세요~
그림참고입니다

레이어를 보시면 이렇게 Layer1이 생겼지요

9.
만들어진 Layer1을 레이어추가하는 아이콘쪽으로
드래그하면 copy1이 하나 만들어집니다

다시 그 copy1을 주욱 아래로 드래그 하면...copy2
copy2를 드래그 ... copy3가
그림처럼 형성이 됩니다. 이렇게 되셨나요^^

10.
이젠 네개의 프레임중 두개는 가로로 세워줘야 합니다
Edit > Transform > Rotate 90CW 로 해줍니다
저는 여기서 copy3와 copy2를 할께요~~
이렇게 레이어가 가로로 변했을 겁니다^^

11.
이젠 레이어 백그라운드를 클릭... 파랗게 활성화되었지요
이 상태에서 새 레이어 추가를 하신 후 (레이어 아이콘 클릭하시면 됩니다)

흰색을 부어줍니다
파일이 이렇게 되어 있을겁니다

12.
레이어를 하나씩 클릭 ....이동
또 다른 레이어 클릭 ...이동
이렇게 이동툴을 이용해서 가장자리로 이동시켜주세요~

다시 각각의 레이어 ....Layer1 ~ Layer Copy3...클릭
Opacity를 40%로 낮추어 줍니다
그림처럼요~~~
잘 따라 오시는 거죠^^

13.
그림에서 모서리가 짙어 보이는 부분을 잘라주겠습니다
레이어는 카피1으로 하신 후 ...
도구툴에서 다각형 툴을 선택 ...
점선처럼 그려 주신 후 ... Delete
그림처럼요.

다시 그림처럼 겹쳐지는 모든 부분은
그 해당 레이어를 선택...
도구툴에서 다각형 툴을 선택 ... Delete
네번의 과정을 거쳐고 나면
이렇게 되지요~

겹쳐지는 짙은 색부분을 잘 보려고 흐리게 했었던 Opacity를
다시 100%로 해주세요...물론 각 내개의 레이어를 선택해서
해주셔야 합니다~~

14.
이제 마지막으로 각 프레임을 좀 볼륨있게 만들어줍니다
레이어 하단을 보시면 f라고 되어 있는 부분을 클릭~!!!
레이어 스타일을 그림처럼 설정을 하시고
Drop Shadow는 그림을 봐 가시면서 적당히 만들어줍니다
물론 각 각 레이어를 클릭 하셔야 적용이 된답니다

저는 이렇게 만들어 보았습니다


